Sprite Stacking: How to Make a 3D Game with a 2D Engine
- Introduction
- Creating a 3D Model
- Importing a 3D Model into GameMaker
- Drawing and Scaling a 3D Model
- Moving the Camera
- Moving Your Player
- Setting the Draw Depth for Multiple 3D Objects
- Adding Animations
- Adding Shadows
Introduction
A few weeks ago I started working on a new game using a graphical technique called sprite stacking, which creates the appearance of a 3D character and environment by layering multiple 2D images to draw each game object.
It lets you turn a set of images like this:
![]()
into an object like this:
To my knowledge only a handful of games have been made this way:
- Nium (gameplay / purchase)
- Step (free download)
- Lisa (free download)
The developer of Nium, Ojiro Fumoto, gave an interesting interview in which he discusses the technique. There are a few good tutorials (notably here, here, and here) covering the very basics of sprite stacking in GameMaker, but I couldn’t find any that cover how to animate sprite-stacked entities or preserve the 3D effect while rotating the game’s camera.
This post will walk through all the information you need to start making your own sprite-stacked game in GameMaker Studio 2. You’ll learn how to:
- Create and import a 3D model
- Draw, scale, move, and animate 3D objects
- Draw multiple objects at the proper depth
- Rotate the camera
You may have also noticed that the gif above appears to have shadows, with the side of each level in the pyramid being drawn darker than the top. I’ll explain how to do that as well – it’s easier than you might think.
Creating a 3D Model
The first step is to make a voxel model for your character. MagicaVoxel is a nice piece of free multi-platform software you can use for this. I’ll assume that’s what you’re using for the rest of this section and the following one.
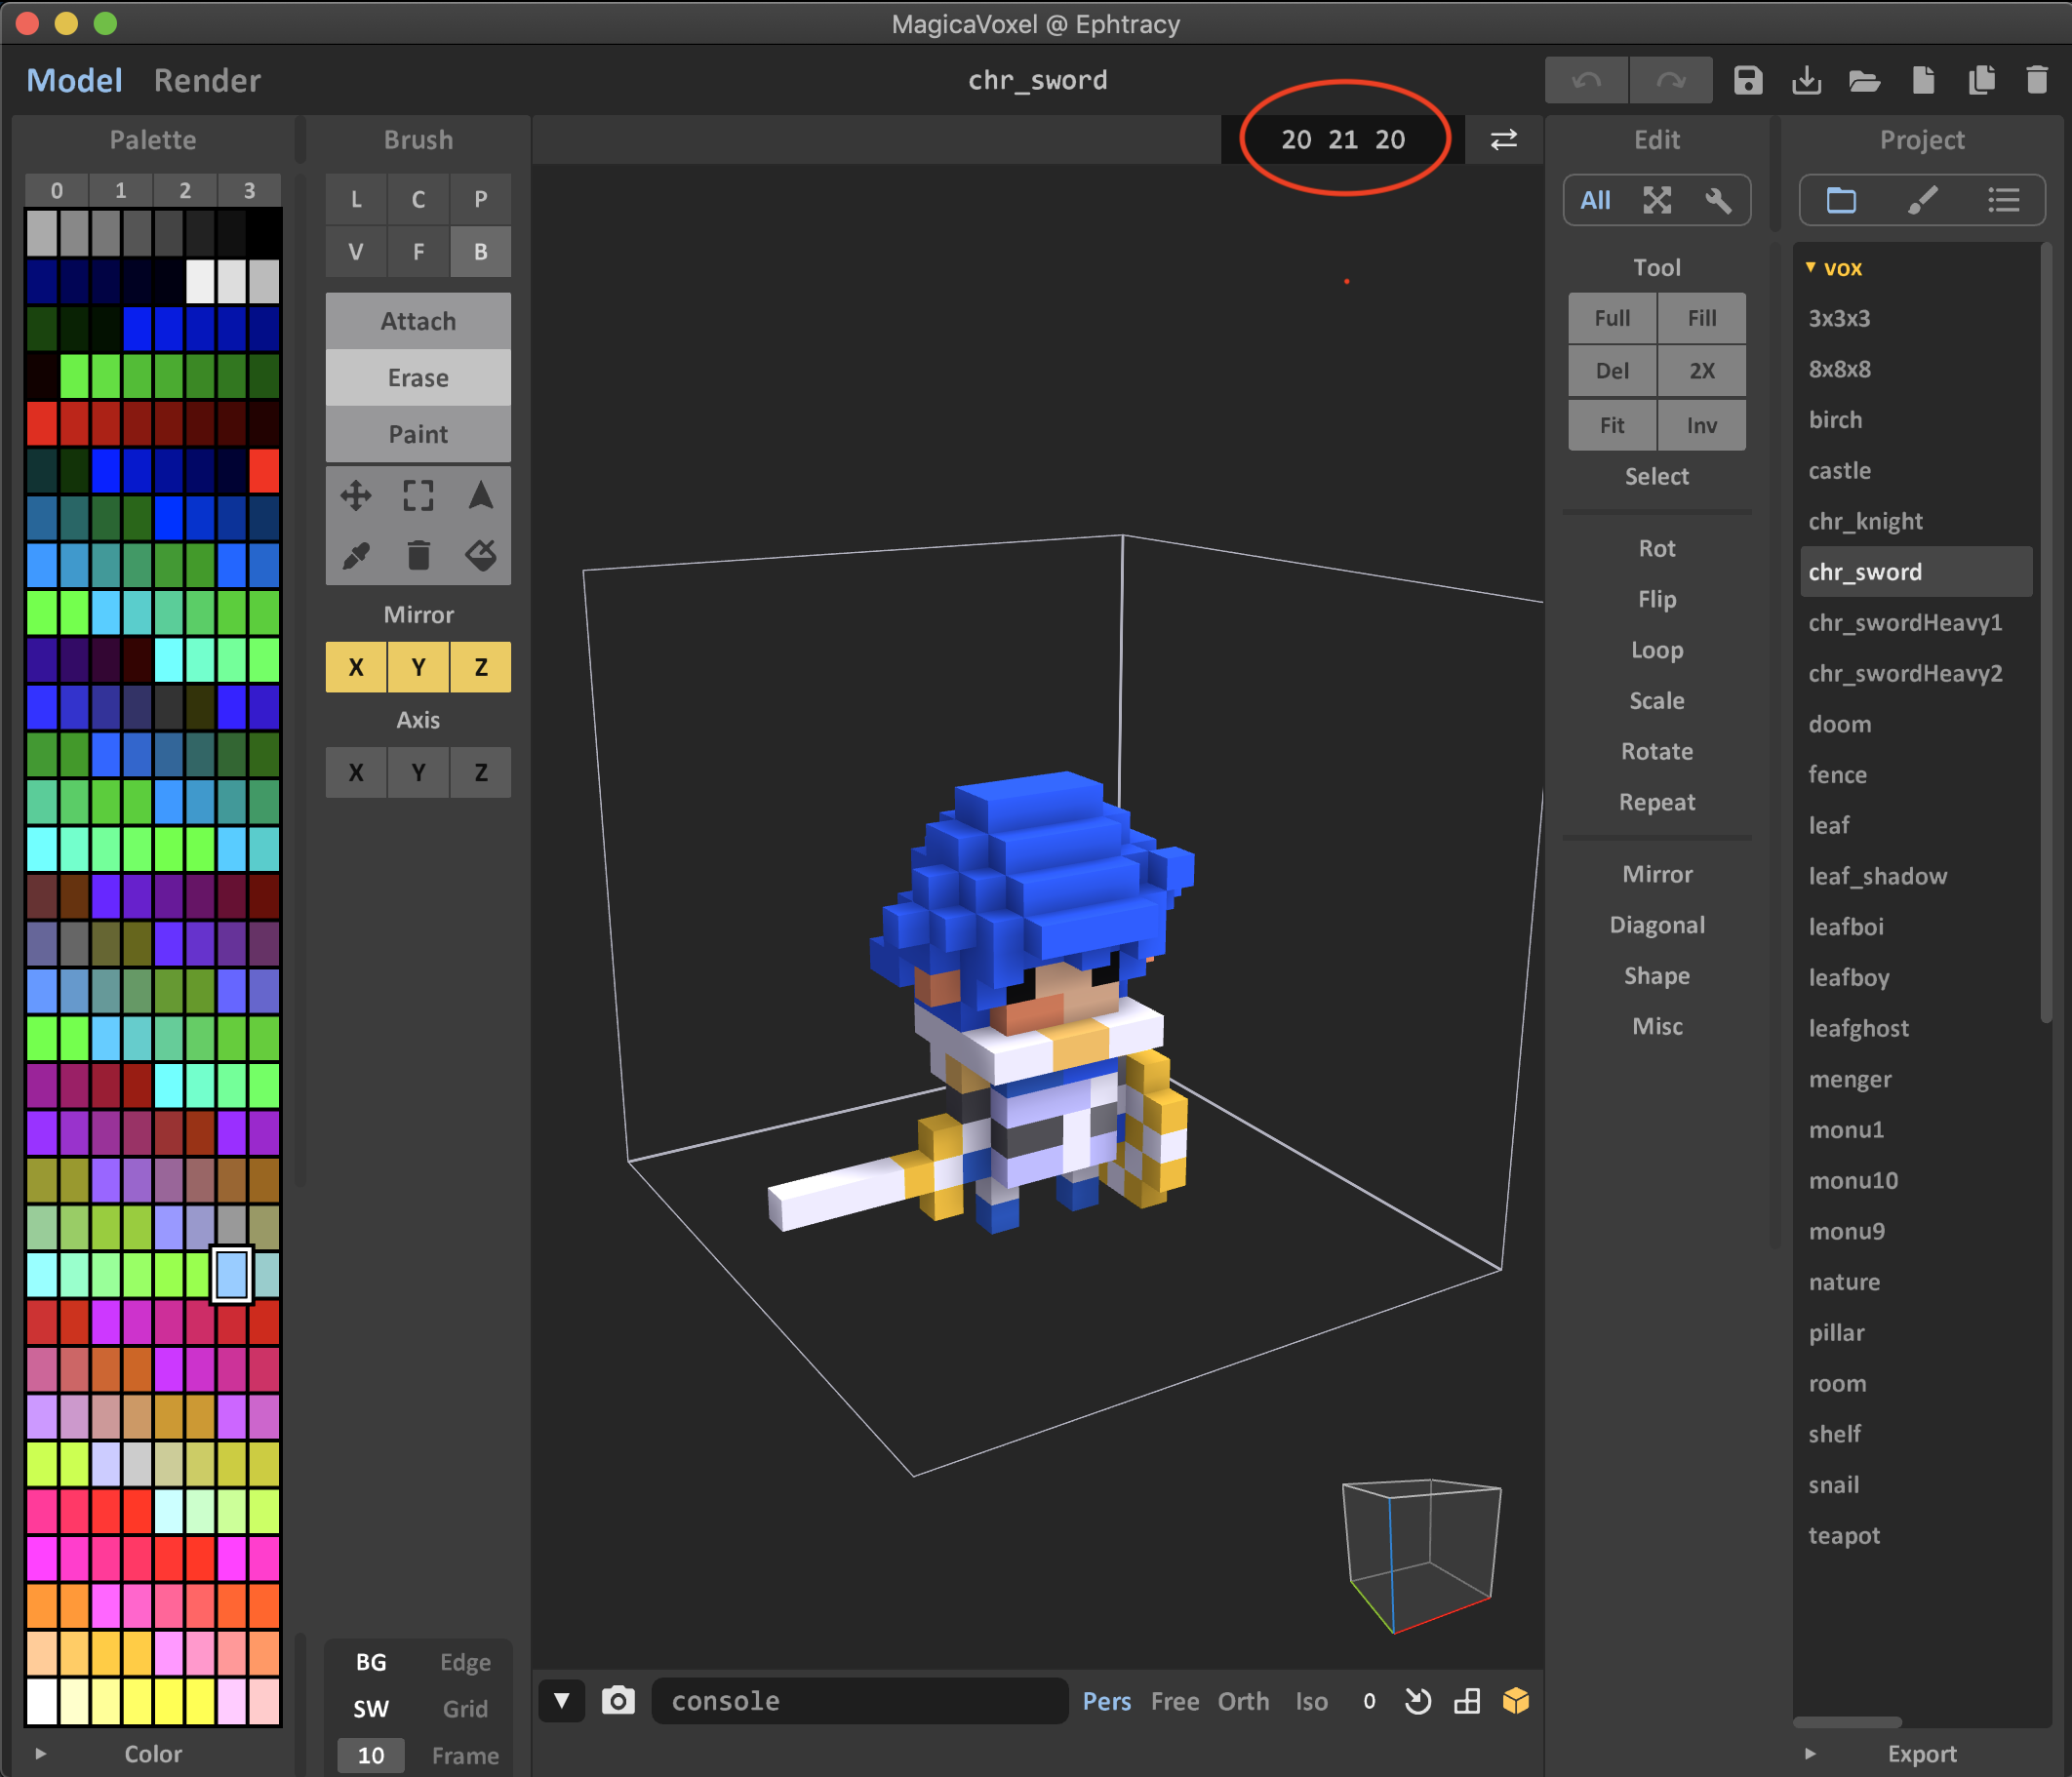
Take note of the three numbers circled in red in this image, they are your model’s X, Y, and Z dimensions. You’ll need them in the next section, and it’s important to set them properly before you start making a new model.
Larger models are harder to animate, require more memory to store, and require more processing power to draw. Taller models are particularly resource-intensive as GameMaker will store each vertical layer as a separate file. Personally I wouldn’t go much larger than 20x20x20, though modern platforms could probably handle a game with considerably higher-resolution models if you have the patience to make them. It’s generally a good idea to use odd numbers for your model’s X and Y dimensions so that it has a precise center point to rotate around.
Note that you can save a step in the next section by drawing your model facing to the right, rather than towards the camera like the default models.
Once you’ve finished making your model, open the Export menu in the bottom right corner, select slice, and save it wherever you’d like. This creates a single .png file that GameMaker will divide into the component images for the vertical layers.
Importing a 3D Model into GameMaker
- Create a new sprite in GameMaker.
- Click
Edit Image, select the menu itemImage -> Import Strip Image, and open the file you just exported from MagicaVoxel. - You’ll be prompted to enter a few parameters which relate to the dimensions of your model. Set
Number of Frames = Z,Frame Width = X, andFrame Height = Y. You should be able to keep the defaults for everything else (Frames per Row = 1and0for the rest). - Click
Convert. - You will probably need to select the menu item
Image -> Reverse Framesto prevent your model from being drawn upside down. - If you created your model facing towards the camera instead of to the right, select the menu item
Image -> Rotate All Frames (anti-clockwise 90).
The result should be a sprite with one frame per vertical layer of your model from the ground up, with your model facing right.
Drawing and Scaling a 3D Model
- Assign your new sprite to an object.
- Add the following lines to the object’s
Createevent:
image_speed = 0;
image_zscale = 1;
The first line disables GameMaker’s built-in animation functionality by preventing it from iterating through the sprite’s frames automatically. Later we’ll create a separate sprite for each frame of an animation and add some code to cycle through them manually.
The variable created in the second line can be used to scale your model vertically in much the same way the built-in variables image_xscale and image_yscale work. The only restriction is that it must be a positive integer.
- Add the following lines to the object’s
Drawevent:var i = 0; repeat(image_number*image_zscale) { var xx = x + lengthdir_x(i,-view_angle[0]+90); var yy = y + lengthdir_y(i,-view_angle[0]+90); draw_sprite_ext(sprite_index, i/image_zscale, xx, yy, image_xscale, image_yscale, image_angle, image_blend, image_alpha) i++; }This will iterate through the frames of your sprite and draw them at a position relative to both their height in your model and the current camera angle. Each layer will be drawn
image_zscaletimes before switching to the next one.
Moving the Camera
First we’ll set the camera to follow our player:
- In the
Propertiespanel of theRoom Editor, open theViewports and Camerasdropdown and check the boxes forEnable ViewportsandClear Viewport Background. - Open the dropdown for
Viewport 0. - Set the
WidthandHeightfor bothCamera PropertiesandViewport Properties. The camera dimensions dictate the size of the portion of your room that will be shown at any one time, and the viewport dimensions dictate the size of the window your game will play in. LeaveX PosandY Posat0for both. - Set
Object Followingto your player’s object. - Set
Horizontal Border = Camera Width / 2 - Set
Vertical Border = Camera Height / 2
The last two steps will keep your player in the exact center of the screen. Reducing these border values will keep the camera from moving until your player gets closer to the edge of the screen.
Next we’ll add controls to rotate the camera. I’m using a gamepad for input (left joystick to move, ), but you should be able to adapt this code for keyboard and mouse input fairly easily.
Add the following code to the step function of some object. You can use a dedicated input object, or just add it to your player object. As long your game only ever has one instance of the object containing this code, it should work just fine.
axisrh = gamepad_axis_value(0, gp_axisrh);
if abs(axisrh) > 0 {
	view_angle[0] += axisrh;
	camera_set_view_angle(view_camera[0], camera_get_view_angle(view_camera[0])+axisrh);
}
This will check whether the right joystick of the gamepad in input slot 0 is moved to the left or right, and updates the primary camera’s view_angle accordingly. The input value ranges from -1 when the joystick is moved all the way to the left, to +1 when it’s moved all the way right.
Moving Your Player
You’ll also want to change your player’s movement controls to be relative to the current camera angle. That way, moving the left joystick up will always move your player towards the top of the screen rather than the top of the room. The following code will also go in your player’s Step event, or you can split it into scripts for handling input and movement separately:
axislh = gamepad_axis_value(0, gp_axislh);
axislv = gamepad_axis_value(0, gp_axislv);

speed = point_distance(0 ,0, axislh, axislv) * walkSpeed;

if abs(axislh) > 0 or abs(axislv) > 0 {
  aimDestination = point_direction(0, 0, axislh, axislv) - view_angle[0];
	direction = aimDestination
	image_angle = aimDestination;
}
First, get input from the gamepad. Then set the speed equal to how far off center the left joystick is, multiplied by some constant walkSpeed which you can define in the Create event.
Then set the player’s direction and the rotation of its sprite relative to both the left joystick’s direction and the camera angle. The if statement here ensures that these updates will only be made if the joystick is off-center. Without that check your player will snap to its default direction when you let go of the joystick, rather than continuing to face in the direction you were aiming. If you find that this is happening regardless, or your player is twitchy, this means your joystick’s neutral position is slightly off-center. You can correct for this manually by changing the conditional to something like if abs(axislh) > 0.1 or abs(axislv) > 0.1, or just use the built-in function gamepad_set_axis_deadzone(0, 0.1).
Setting the Draw Depth for Multiple 3D Objects
Next we want to ensure that objects which are closer to the camera are drawn over objects which are farther away. Skipping this step will completely ruin the 3D effect. The following code must be added to the Step event of every visible object in your game:
var CamForward = -view_angle[0] + 90;
depth = dot_product(x,y, lengthdir_x(1,CamForward ), lengthdir_y(1,CamForward )) - 1000;
This just updates the object’s draw depth relative to both its x/y coordinates in the room and the camera angle.
The - 1000 at the end of the second line is very important. The amount you need to subtract will vary depending on the size of your room but it doesn’t have to be precise, just sufficiently large. Objects with higher depth values are drawn farther away from the camera, with the background layer at depth = 100. This means anything with depth > 100 gets drawn behind the background, making it invisible. If you don’t subtract some large number from everything’s depth, things will start to disappear at certain camera angles, like so:
Adding Animations
Now we’re ready to animate our player. Since we’re already using sprite frames to give our objects height, we can’t use them for animation as intended. Instead, you’ll need to make a new voxel model for every frame of animation and make your object cycle through them manually. Creating these models will almost certainly be the most time consuming part of making a sprite-stacked game. You’re on your own for that part, but I’ll walk you through the full process of coding a simple three-frame animation.
First you’ll need to initialize four new variables in your player’s Create event:
animationCounter = -1;
frameCounter = -1;
state = PLAYERSTATE.FREE;
defaultState = PLAYERSTATE.FREE;
Then create a Script named Animate with the following contents:
if argument0.frameCounter <= 0 {
	if argument0.animationCounter >= array_height_2d(argument1) {
		argument0.state = argument0.defaultState;
		argument0.frameCounter = -1;
		argument0.animationCounter = -1;
		argument0.sprite_index = sPlayerFree;
	} else {
		animationCounter += 1;
		argument0.sprite_index = argument1[animationCounter, 0];
		argument0.frameCounter = round(argument1[animationCounter, 1] * fps)
	}
}

argument0.frameCounter -= 1;
This script will help simplify the process of cycling through sprites. It takes two arguments as input: an object to be animated, and an “animation” to be rendered on that object. Each animation is structured as a 2D array with two columns and arbitrarily many rows. The first column contains the sprite to be displayed, and the second column contains a number indicating the duration for which that sprite should be displayed. We’ll define one of these animations in a moment.
First you’ll need to set up a state machine for your player, the same way you probably would for a regular 2D game. This defines the core logic of what actions your player is able to take and when. They’ll begin in the PLAYERSTATE.FREE state, in which they can walk around the map. When a certain button is pressed they’ll enter the PLAYERSTATE.ATTACK state, which forces them to stop moving, plays an attack animation, and then returns them to the PLAYERSTATE.FREE state.
Listen for input from the attack button in the player’s Step event:
keyAttack = gamepad_button_check_pressed(0, gp_shoulderr);
Then add a switch statement to the Step event that checks for the player’s current state and runs the appropriate function:
switch(state) {
	case PLAYERSTATE.FREE: PlayerState_Free(); break;
	case PLAYERSTATE.ATTACK: PlayerState_Attack(); break;
}
Now we can define these two state functions with two new Scripts. Since we want the player to be able to move around while in the free state, let’s relocate our earlier movement code from the main Step function to a script named PlayerState_Free, and add to it an if statement to check for attack input and change the player’s state accordingly. Combined, this script should look something like:
var aimDestination = point_direction(0, 0, axislh, axislv);
if abs(axislh) > axislDeadzone or abs(axislv) > axislDeadzone {
	direction = aimDestination;
	image_angle = aimDestination;
}

speed = point_distance(0 ,0, axislh, axislv) * speedMultiplier;

if keyAttack {
	state = PLAYERSTATE.ATTACK
}
The PlayerState_Attack script will stop the player’s movement, define the attack animation array, and pass that array to the Animate script:
speed = 0;

animation[0, 0] = sPlayerAttack0;
animation[0, 1] = 0.1;
animation[1, 0] = sPlayerAttack1;
animation[1, 1] = 0.1;
animation[2, 0] = sPlayerAttack0;
animation[2, 1] = 0.1;

Animate(oPlayer, animation);
This assumes you have created two new sprites named sPlayerAttack0 and sPlayerAttack1. When the Animate script is called, it will change the sprite of the player object to sPlayerAttack0 for 0.1 seconds, to sPlayerAttack1 for 0.1 seconds, and back to sPlayerAttack0 for another 0.1 seconds. Once that’s finished, Animate automatically resets the player to its default (free) state, and we’re done!
Adding Shadows
As I mentioned in the introduction, there’s a simple way to add shadows to your sprite-stacked objects which will greatly enhance the 3D effect. Just follow these steps:
- Open
Game Optionsby clicking the gear icon in the toolbar at the top of the GameMaker window. - Under
Platform Settings, select the platform for which you want to enable shadows. - Select the
Graphicstab. - Check the box for
Interpolate colours between pixels.
That’s it! Honestly I’m not 100% sure why this works, I discovered it by accident while playing around with the various graphics settings. My guess is that GameMaker treats transparent pixels as black for the purpose of interpolation, so that a pixel next to a transparent pixel gets darkened. The gif in the introduction section above seems to confirm this – the red 2D image is the only one without an outer ring of transparent pixels, and the corresponding layer of the 3D pyramid is the only one that doesn’t have a shadow.
So far I’ve only tested this feature on macOS, but the setting is available for Windows and Ubuntu so I expect it will work there as well.